
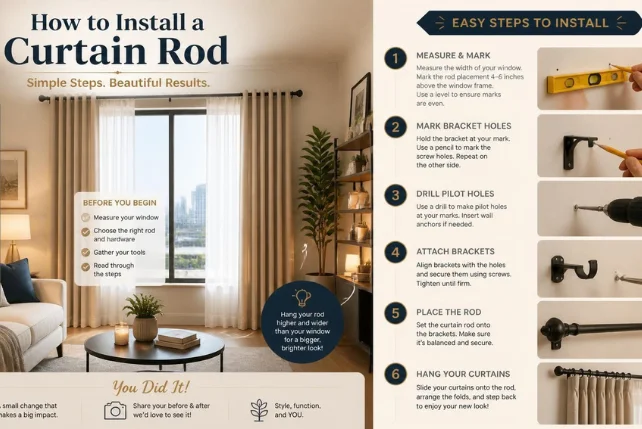
Learning how to install curtain rod hardware correctly starts with careful measuring, not drilling. The brackets must sit level and hold the expected curtain weight. Good placement also helps the window look taller and lets opened panels clear more glass.
| Installation detail | Practical starting point |
| Rod height | About 4–6 inches above the window frame |
| Side extension | About 3–6 inches past each side |
| Fastening | Use studs when practical or weight-rated wall anchors |
| Long spans | Add a center support when required by the rod instructions |
| Basic tools | Tape measure, pencil, level, drill, bits, screwdriver, stud finder |
TL;DR: Key Takeaways
- Measure the window, curtain length, and side clearance before drilling.
- Start around 4–6 inches above the frame and 3–6 inches beyond each side.
- Fasten into studs when practical, or use anchors rated for the wall and load.
- Level every bracket mark and add center support when the hardware requires it.
To install a curtain rod, measure the window, mark matching bracket positions, and confirm both marks are level. Fasten brackets into studs when possible, or use weight-rated anchors for hollow drywall. Add a center support when the span or manufacturer instructions require one, then mount the rod and test the curtains.
What You Need Before You Start
Most installations need only common household tools and the hardware supplied with the rod. A drill makes pilot holes and anchor installation faster. Eye protection is also sensible whenever you drill overhead or into painted drywall.
- Tape measure.
- Pencil.
- Level.
- Drill and suitable drill bits.
- Screwdriver or driver bit.
- Stud finder.
- Step stool or ladder.
- Wall anchors rated for the expected load.
- Brackets, screws, rod, finials, and curtains.
Check the package before making any holes because mounting systems vary. Some brackets use two screws, while others use three or include special anchors. Follow the manufacturer’s fastener guidance over a generic anchor size.
For broader styling ideas, HomeVotel’s guide to stylish home upgrades covers how details such as curtains affect light, privacy, and room character. Its interior design ideas can also help you match the hardware finish to the room. Make those design choices before drilling so you do not have to reposition the brackets later.
Measure Height and Width Before Drilling
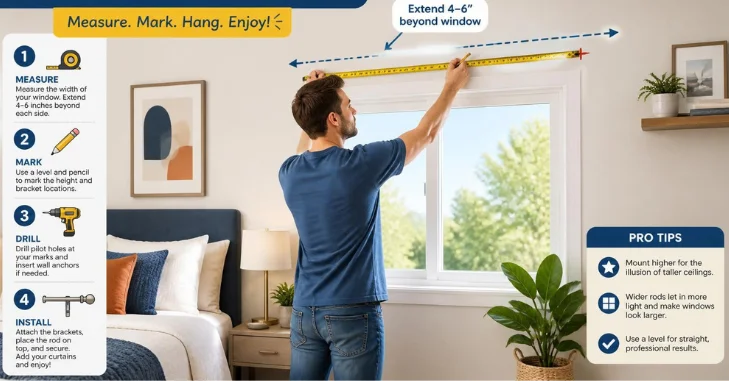
A useful starting point for how to install a curtain rod is mounting it about 4–6 inches above the top of the window frame. This range is also used in current guidance from major home-improvement sources. You can mount higher when the room proportions and curtain length support that choice.
For width, extending the rod about 3–6 inches past each side works for many windows. Extra width gives opened curtains more space to stack beside the glass. That can let in more daylight and make the opening look wider.
Measure your actual curtain length before finalizing the height. Grommets, rings, tabs, and rod pockets change where the fabric begins. A placement that suits one heading style may leave another panel too short.
A Simple 60-Inch Window Example
Suppose the outside trim measures 60 inches wide. Adding 5 inches on both sides creates a 70-inch planned span. Check finial clearance and nearby walls before buying or extending the rod.
Mark the left and right bracket positions from the same reference points. Do not measure one bracket from the floor and the other from the ceiling. Small differences in floors, trim, or ceilings can make those separate measurements misleading.
How to Install Curtain Rod Hardware in 7 Steps
- Choose the final height and width. Measure the window trim, curtain length, side clearance, and planned bracket locations before drilling.
- Find studs near the marks. Use a stud finder and shift a bracket slightly when a suitable stud is close to your planned position.
- Mark the screw holes. Hold each bracket in position, check its orientation, and mark every mounting hole with a sharp pencil.
- Confirm both brackets are level. Use a long level across the marks or temporarily position the hardware before drilling.
- Drill pilot holes and install fasteners. Use screws in studs or compatible weight-rated anchors where the wall is hollow.
- Attach the brackets and center support. Tighten the hardware securely without crushing drywall or stripping screw heads.
- Hang the rod and curtains. Install the panels, place the rod in the brackets, add finials, and test movement.
Lowe’s recommends marking bracket locations first and using a level before final installation. It also recommends drywall anchors when the marks don’t align with studs. Doing those two checks in that order matters, because a crooked mark is much harder to correct once the holes are drilled.
The Home Depot gives similar guidance for drywall installation. Its process includes marking screw holes, drilling guide holes, installing anchors, and fastening the brackets. That four-step sequence matches what most bracket packages describe, so follow whichever order your own hardware specifies.
How to Choose Fasteners for Your Wall
Studs provide a strong attachment point for standard residential hardware. If a stud lands close to the planned position, moving the bracket slightly can simplify the installation. This Old House also recommends checking for studs before finalizing placement.
Hollow drywall usually needs anchors unless the mounting kit uses a different fastening system. Choose anchors rated for the combined hardware and curtain load. Drill the hole size listed by the anchor manufacturer rather than guessing.
Plaster, masonry, tile, and other hard surfaces need different bits and fasteners. Don’t force a drywall anchor into a wall it wasn’t designed for. Stop and identify the wall material before choosing the drilling method.
HomeVotel’s home-aesthetic improvement tips can help coordinate lighting, wall decor, and window treatments. They are useful during a larger room refresh. Its home-office window privacy guide covers another option for privacy-focused spaces.
When You Need a Center Bracket
Longer rods can sag when fabric weight is concentrated between the end supports. Many systems include a center bracket or specify when you need one. Follow the product instructions because rod diameter, span, and curtain weight all matter.
Lowe’s notes that rods wider than four feet may need center support. This Old House also recommends center support for longer or thinner rods. Adding that support during the initial layout is easier than correcting a sag later.
Place the center support on the same level line as the outer brackets. Check that it does not interfere with curtain movement or a split-panel opening. Some curtain arrangements need rings or panels divided around that support.
Common Installation Mistakes to Avoid
- Mounting the hardware before checking curtain length.
- Placing both brackets without verifying level.
- Using hollow-wall screws without suitable anchors.
- Choosing anchors without checking their load rating.
- Forgetting finial clearance near side walls.
- Making the rod too narrow for curtain stack-back.
- Skipping a required center support.
- Overtightening screws until you damage the drywall or plaster.
The most expensive mistake is often repositioning the hardware after drilling. Measure the full window treatment first, then confirm the marks from across the room. A few extra minutes of checking can prevent visible patching later.
Another common issue is copying a measurement from a different window. Trim height, floor level, and nearby obstructions can vary within the same house. Measure each opening separately even when the windows look identical.
Can You Install Curtains Without Drilling?
Renters may prefer tension rods or no-drill mounting products when the window layout allows them. These options work best when their rated load matches the curtain weight. Heavy blackout panels may exceed the capacity of lightweight temporary hardware.
A tension rod normally fits inside the window opening instead of above it. That changes the look and may reduce how much glass is exposed when panels open. Check lease rules before using adhesive or compression-mounted products.
No-drill options solve a different problem than permanent wall brackets. They can be useful for short-term privacy or light curtains. Permanent hardware is usually more flexible for high-and-wide decorative placement.
Finish the Job With a Level Check
After hanging the curtains, open and close them several times. Watch for bracket movement, rod sag, scraping rings, or fabric catching on the supports. Recheck the level before fully tightening any adjustable set screws.
A careful installation improves both function and appearance. A strong result comes from matching the wall fastener, bracket spacing, and curtain dimensions before drilling. Once those details agree, the final mounting work is straightforward.
For more practical home projects, browse HomeVotel’s home improvement section. Use the same measure-first approach for any wall-mounted upgrade. It reduces rework and helps finished rooms look intentional.
Frequently Asked Questions
How do I install a curtain rod on drywall without a stud?
Use wall anchors that are compatible with drywall and rated for the expected load. Drill the hole size specified by the anchor manufacturer. Then fasten the bracket through the anchor and test the connection before hanging fabric.
How high should the rod be above the window?
About 4–6 inches above the upper frame is a practical starting point for many U.S. rooms. Higher placement can work when the ceiling, trim, and curtain length allow it. Keep the final height consistent across windows that share the same wall.
How far should the hardware extend past each side?
A 3–6 inch extension on each side works for many standard windows. Wider placement leaves more room for opened panels beside the glass. Check nearby walls, switches, and finials before choosing the final width.
Do I need wall anchors for every installation?
No, brackets fastened securely into suitable studs may not need hollow-wall anchors. Anchors are commonly used where bracket screws land between studs in drywall. Always follow the rod and fastener manufacturer’s instructions for the actual wall type.
When should I add a center support?
Add one when the rod instructions call for it or when the span needs extra support. Longer, thinner rods and heavier curtains put more stress on the end brackets. Plan the center support before hanging panels so it does not block their movement.